
Hillman Imp Restoration

I bought the imp as an unfinished project in the summer of 2020 with the view to restore it back to a usable condition after being taken off the road back in 1984.
The car itself was in an incredible poor state and had multiple bodges over the years presumably to keep it on the road, The 67' shell was however renowned for being a decent shell as it featured a few cross over parts between the mk1 and mk2 imps. The suspension on the imp was revolutionary at the time and with a light weight aluminium engine located in the rear was favoured in many motorsports events of the period.
The imp in it's running in stage
Upon Arrival


The imp arrived on the back of a trailer after going to view it and falling for it.
Obviously I knew it was going to be a lot of work but was prepared to take it on and learn lots along the way!
I should prefix this by saying id never picked up a welder at the point of purchase and despised metal work with a passion, this soon changed as soon as I delved into this project. It was bought as a fairly 'solid' shell which was found to be a bit of a stretch of the word solid! however it was mostly complete and intact for the most part.
Digging Deeper


As seen in the pictures the car was far from solid the only good part was the floors were in relatively good condition only requiring a couple of patches.
all 4 corners of the car needed to be replaced with brand new steel pressings, and arches needed serious attention! The previous owner had brazed repair panels on and used body filler to shape them back in, this was fairly common practice back in the day to keep the car on the road.
When I first got the car my main priority was to get the suspension components overhauled and back on the car to get make it easier to roll about the workshop.


I had the front wishbones, rear trailing arms and crossmember shot blasted to get the majority of the rust and old paint off, these were then treated with rust converting solution and galvanising paint along with a heavy coat of tractor enamel, which should see them last for a while.
The brakes had all new components as these were quite important in my eyes! all of the perished rubber bushes were replaced with polyurethane motorsport bushes which should improve the handling of the car somewhat.
all new shock absorbers and springs were bought for the car from Gaz Shocks.


Engine Rebuild

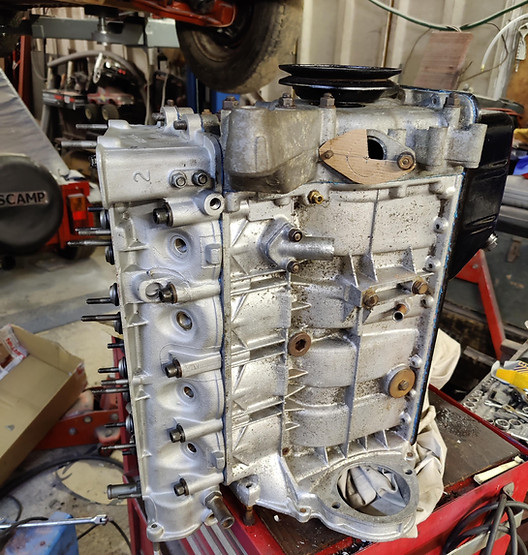


When I first got the car the engine was sat on the passengers seat and a huge unknown as the person we bought the car off had never seen it run, we initially got it running but it was only firing on 2 cylinders, so I stripped the engine right back down to it's bare components to check everything over, to my surprise the engine had been rebuilt and looked to have brand new pistons, shells. This was a huge relief and the 2 cylinders problem was caused by 2 stuck piston rings on pistons 2 and 3 obviously where it had been sat for years.
I decided to hunt for a newer l4 head to go on the engine as these were a lot better than the original head with more options for bigger camshafts etc... thankfully I found one at a decent price which had been stripped and vapour blasted all it needed was a skim and valves lapping back in with some new exhaust valves. We then fired the engine up and it ran sweet as a nut.

Body Work & Rust Repair


Spare wheel well had rotted through, these are not a readily available part so I had to resort to beating a panel to shape this was done with limited tools and done to serve a purpose as this portion is barely seen.


The offside rear quarter had a panel brazed over the rusted original , this was all cut back and panel beat back to the original shape, the new panels were purchased from Expressed Steel Panels, the inner skin is not available so this one had to be fabricated.


Both front corners of the car were heavily perforated and could not be saved, so again new panels bought in and welded in place, these also needed quite extensive work to the inner wheel arch as it had been bodged up presumably to get it through an MOT.


The nearside rear quarter was by far one of the worst parts of the car, however it didn't need much work to the inner skin, this panel was bought from Jeff Day who has been making panels for some years and is an expert in all things imp. I was able to get this panel custom made to incorporate more of the wheel arch, the fit was good but it did need some fettling to get the fit bang on.

The front edge of the scuttle panel under the windscreen needed replacing, this was a job I had dreaded for a long time but it came out alright, I had to replace around 2 feet in total of the front of the panel, it was found easier to complete this in sections so as not to risk losing the shape of the front.

The front suspension mounts had rotted through and a renowned for going on the imp as it is a water trap on the inside of the inner wing, i decided to do the common mod of boxing in the outside of the turret and cutting though to meet it in the boot/ bonnet area.
I decided to run locking bonnet pins however the landing pad on the front slam panel was not in the right place for the look I wanted so I fabricated some plates to move the position inboard and to add strength to the front slam panel.

The engine lid is made from a single skin of fibreglass this was originally for use in silhouette racing however after being let down so many times trying to find fibreglass components for the car i snapped it up as it was local. I spent lots of time deliberating over what pattern I was going to cut for ventilation, I settled on this triangle pattern there is no other imp running this style, the holes will get stainless steel mesh overs to stop hands and debris entering the engine bay.


The whole car then sprayed with high build primer and blocked back, this was the first time i had ever sprayed anything bigger than a guitar body with a real spray gun.

The colour was then sprayed, again another first having never sprayed this much paint onto anything! thankfully it all came out pretty well, obviously it is nowhere near as good as a professional job but it suited the overall race car look I was going for.
The colour was a huge decision, its a Porsche carmine red that is being used on some of the modern Porsche ranges, its is close to the original colour it does however have a much richer red tone rather than the orange tones the original colour has. The Porsche colour can appear burgundy under some lights too. It is a solid colour with no metallic or pearlescent additives I chose a solid colour for a few reasons but mainly to make it look more period correct.
Modifications/ Modernisations


A few mods I have done include, a HDPE throttle pedal pad to aid the feel of the throttle, I have added a fuse box from a mk4 VW Golf as the original imp didn't feature any fuses I have also added an alternator to make the car slightly more reliable. The original radiator was re cored using a high efficiency core by CPA Services Grantham, this is also used in conjunction with a new heater valve and a restrictor in the bypass hose to aid flow through the cooling system.


I had bought a resin 3d printer to help with some of the lockdown university work, this came in useful for doing odd parts on the car like this rev counter holder which attaches where the ash tray should have been. This put the rev counter in the drivers eyeline and can be positioned to suit any height of driver. I also designed and printed a HT lead organiser to tidy the engine bay area up.

I have also printed a velocity stack for my Stromberg CD150 carburettor this aids flow of air into the carb at a greater rate, this also angles out into the fresh air of the back of the car in hopes to lower intake air temperatures. I used a Ram Air filter sock over the top of the velocity stack to filter any debris out of the intake air.


Current


